FIRE HOOPING GUIDE
Welcome to the world of fire hooping!
Disclaimer: This document is meant to be an introductory guide for new fire hoopers and is not a substitute for proper fire safety training. Superhooper.org is in no way responsible for injuries to the performer or audience member resulting from your use of the fire hoop. NEVER, EVER hoop with a malfunctioning fire toy. Check your equipment before EVERY use, and know your fire safety. Be Sober. Be Safe. Be Professional.
Introduction
Fire, the original gathering place of man. Its warmth and light indulge the primal spirit and mesmerize our eyes with its flickering, dancing tips. Fire is alive. It is born, it grows, consumes and eventually dies. Its life must be respected, and interaction with such a strong element requires an understanding of its nature.
The Good News is that the Fire Hoop is ostensibly the safest fire toy there is. Standing still with a fire hoop, the flames are always 7-9” from your hands. When you begin spinning your fire hoop, centripetal force flattens the flames horizontally and points them away from you.
That Said, Respect the Flame. There’s truth to the old adage « If you play with fire you’re going to get burned. » Have some respect for the danger present and the reality of the situation. Be sober. Be safe. Be professional. Proper care and use of your fire hoop, coupled with rigorous fire safety guidelines will make for a successful, safe, and impressive display for you and your audience every time.
Table of Contents
I. Tool Bag
II. Fuel and Safety Stations
III. Checking Your Equipment
IV. “Safety” Person
V. Checking Yourself
VI. Defining Your Space
VII. Introduction to Fuels
VIII. Fueling and Lighting your Wicks with Care
IX. What to Expect
X. Ending your Performance
XI. Performing in Public Spaces
FIRE SAFETY
I. Make a Fire Tool Bag and Carry it With you to Every Performance.
A fire tool bag carries the essentials you will need for even the most casual performance and exudes professionalism. A tool bag insures that you have everything required for a successful, safe burn and the items necessary to care for even the most minor emergency or injury.
Keep your tool bag packed at all times with the following equipment. Before lighting up every time, double check the contents of your fire tool bag. If you don’t need it, someone else will. Be smart, be prepared.
You should have:
• A tool bag that can store everything listed below.
• 1-2 clearly labeled fuel squirt bottle(s). There’s more about squirt bottles further on (See Section VIII A), but we recommend fueling your wicks with squirt bottles as opposed to dipping your wicks. Have a good, easily sealable, plastic squirt bottle on hand for fueling the wicks on your hoop. It should be VERY clearly labeled with the fuel you are using. The label should be easily visible in the dark. We recommend white electrical tape with permanent marker (Sharpie) writing. NEVER mix fuels in bottles. If you use two fuels, you will need two, clearly-marked squirt bottles.
• A head-lamp is crucial. Since you’ll most likely be burning your fire tool after dark, you need to be able to see your equipment clearly when checking and double-checking it and especially when fueling your wicks.
• A wrench for tightening the hardware on your fire hoop. Make sure that the wrench fits your fire hoop. The SuperWickit LED/Fire hoop takes a 7/16” wrench.
• A mini, or small, fire extinguisher. Verify that you know how to use it before you need to. If flames from your fire tool ever reach dry ground, or fall near the fuel dump, you’ll be grateful. Burning in a public place (see Section X) will also LEGALLY require the presence of a fire extinguisher.
Note: When purchasing a fire extinguisher, be sure to pay careful attention to what you are buying. Different types of extinguishers are made for different types of fires. A dry chemical ABC extinguisher is budget-friendly and will put out a variety of fire types, including liquid-based fires.
• A fire blanket (duvetyne) or damp (not soaking wet) towel. We strongly recommend investing in a duvetyne fire blanket. It is a piece of black, inflammable fabric you will use to extinguish your wicks if you do not complete
your burn OR to quickly cover and protect yourself or another burner if flames are transferred to clothes or hair. To be on the safe side, your duvetyne (or damp towel) should be the size of a beach towel.
• Silver sulfadiazine cream. Invaluable for moderate to severe skin burns. Requires a prescription from your general practitioner, but shouldn’t be difficult to obtain. Just explain why you need it. It is not expensive, about $12 for a small tube. If you, or someone else, ever needs a burn cream, you’ll be glad you have it. Should you ever need to use silver sulfadiazine (more commonly called silvadene), slather it on generously, and do not wipe off.
• Neosporin. Just fine for mild burns, scrapes, or cuts of any kind.
• A well-stocked, basic first aid kit. A first aid kit will provide you with the basics – gauze, tape, band-aids. Never put alcohol on a burn.
• Water bottle. You may need to wet your (long) hair down, or the hair of a fellow performer. But, if not, you absolutely will be thirsty. Drink lots of water before and after you burn.
• A Designated “Safety” Person. Your “Safety” is the active extension of your tool kit. (See Section IV: Never Light Up Alone.)
II. Fuel and Safety Stations
You will need to two separate areas for fuel and safety equipment.
A. Create a Safe Fuel Dump.
• Your “fuel dump” is for fuel and fire tools only.
• There is absolutely NO smoking near or around the fuel dump.
• All fuels and fire toys should be located in one spot, AT LEAST 20 feet from the performance area and from the crowd.
• All fuel should be sealed at all times. The only exception is when you are filling your squirt bottle / fueling your wicks (See Section VIII A). NEVER leave an open container out. Open fuel containers are unprofessional, disrespectful of your fellow performers and your audience, and an accident waiting to happen.
B. Create a Safety Station.
• The “safety station” is for safety equipment only. This is where you should store your emergency equipment:
o fire extinguisher(s)
o first-aid kit(s), and
o ideally (especially in dry conditions) a 5 gallon water bucket.
o Your Safety Station should be AT LEAST 10 feet from your Fuel Station. If a fire breaks out near your fuel station, you will need to be able to reach your safety station safely and quickly.
III. Check and recheck your equipment.
A. The wicks on your fire hoop are made of Kevlar wicking and thread, a material that burns without being consumed. We recommend that you cover your wicks when not in use, to protect them and the space where they are stored (You don’t want soot on your walls!). A good set of thick socks will do the trick. In a pinch, you can use ziplock bags and rubber bands.
B. Always ensure that your equipment is intact and ready before lighting up. Check every connection, every bolt, every nut, and every wick. Every time. Use a wrench that fits the hardware of your fire hoop (7/16” for the SuperWickit). There’s nothing more dangerous than a flaming wick hurling towards a crowd of onlookers, or worse, towards the fuel dump.
Loose hardware on your fire hoop endangers you, other performers, and your audience. Again, verify before every performance, that every bolt, wick, and nut is tight on your hoop. Check your equipment twice.
C. Part of checking your equipment is “spinning-off.” Spinning-off your hoop insures that there is not excess fuel on your wicks. (See Section VIII A of the fueling section for more on spinning-off.)
IV. NEVER, EVER Light Up Alone – Have a Safety Person
• You should have a designated “safety” for EVERY performance, no matter how casual. A “Safety” is someone that you entrust with your fire extinguisher, your tool bag, and most importantly, your fire blanket.
• Your Safety is also in charge of crowd control and maintain a safe people-free and object-free burn space.
• Your “Safety” is responsible for watching you burn. S/he watches your clothes, hair, and skin while you burn.
• Your “Safety” should be ready to attack any flame on your person with your fire blanket (duvetyne or towel).
• S/he should also stamp out any errant flames that catch on dry ground. You and your Safety should know how to use your fire extinguisher, as well as the fire blanket.
• We recommend a standard first aid course to everyone involved in a fire performance, performers and safeties alike.
Always have a “Safety.” Your Safety is the most essential, and the only active, part of your tool kit. Your Safety should be attentive, focused, and SOBER.
V. Check Yourself.
Are you ready for fire? You don’t have to light up if you don’t want to. Be certain that you are feeling up to a burn, and above all, be SOBER.
• Clothes. All-natural fibers, like Cotton. You should not be wearing any synthetic clothing – they can melt to your skin. Your clothing should not have easily sparked frays or rips. Be certain you are not wearing any loose articles of clothing that can tangle up in the spines of your hoop. To be sure, have your Safety check your clothing, too.
• Hair. If you have long hair, it should be put up in a bun-like configuration, or tucked away in a hat or wrap. Hair that cannot be secured should be wet down just before you perform. Burns to the hair are the most common danger for fire hoopers, especially when neck-hooping. Get your hair out of the way.
VI. Define your space.
As you prepare to burn, look at the space available. Protect yourself and your audience by making sure that there is adequate space available for what you want to do with your fire tool.
• Walk the Space with your UNLIT fire hoop. This is the most effective way to let everyone within distance know that you are preparing to burn. It also gives them, you, and your Safety a clear idea of how much space you will be using. Ask on-lookers to move out to a safe distance as you walk the space.
• Look ABOVE you as well as to your sides. Be aware of overhanging trees.
• Check the GROUND. Is there anything you could trip over, slip on? Is it a good space for you to lie down, get on your knees, etc.?
• After you light up (See Section IX), first circle your space with your LIT hoop, asking onlookers once again to move back, double-checking the ground and the space above you.
Communication with your Safety cannot be overstated. Let your Safety know what your plan is, where you are going to be, and how you plan to move. Alert your Safety if you will be trying anything new during the performance, or if you will be attempting tricky moves (like the “Pizza Toss”).
While you are fire hooping, your Safety should also keep a look out for people that cross the boundary you require. If performing in public, do not underestimate the strength of a drunk determined to touch your “pretty” fire toy! They should be stopped immediately by your Safety.
VII. Intro to Fuels
There are many different opinions out there on what fuel should be used. Here are the pros and cons of the most common options.
• Lamp Oil – Best for Beginners. When we first started fire hooping we used nothing but 100% pure lamp oil. We recommend this clear, liquid fuel for newcomers to fire because it has a high flash point (the higher the flash point the hotter it needs to be to combust) and thus does not burn as hot as other fuels. Lamp oil, once on fire, has very little chance of transferring liquid flame to clothing, skin or other objects it may come in contact with. It also provides the longest burn time per amount of fuel used. The downsides of lamp oil are that it is not eco-friendly, it leaves an oily feel with everything it comes in contact with, can be very slow to light, and is more expensive than white gas. Lamp oil will produce a more yellow-orange colored flame. Where to Get it . You are most likely to find 100% pure lamp oil in the oil lamp/candle section of a hardware store or WalMart.
• White Gas/Lamp Oil Mix. Eventually you will find that lamp oil can sometimes be slow to light up. Not a problem in your backyard, but if you are performing, you may desire a more reliable method. The quickest remedy is to fuel your wicks with lamp oil and THEN squirt a small amount of white gas on your wicks just moments before you will perform (see next section, Fueling your Wicks with Care). The wick will light rapidly and the gas will be consumed immediately.
• White Gas. At some point, you may also prefer to use white gas alone on your wicks. The most important differences are that white gas burns much hotter, brighter and more quickly than lamp oil. So … you will feel more heat from the flames while you are hooping, you will have less visibility, and your burn will be somewhat shorter. White gas also evaporates very quickly. You will need to begin your burn as soon as possible after fueling your wicks to get the most use of your fuel and a good burn time. Where to Get it. The most common and least expensive form of white gas is Coleman’s Camp fuel. You will nearly almost find it in the camping section of WalMart, and often even at grocery stores near the charcoal.
Fuel Flame Burn Time Flash Point Expense
Lamp Oil yellow-orange about 3 min High about $15 for 2 liters
White Gas white-yellow about 2 min Low about $12 for 1 gallon
VIII. Fueling and Lighting your Wicks with Care
A. Squirting Your Wicks Versus Dunking your Wicks. Like many performers, and not knowing any other fire hoopers when we started fire hooping, we dunked our wicks into a small paint can of fuel. This would always result in uneven burn time amongst the wicks, as well as excess fuel on the wick which needed to be spun off or wrung out. After some trial and error, we now simply choose not to use excess fuel.
To accomplish an even burn with as little fuel waste as possible, fuel your wicks with a pull-top squeeze-style plastic sports bottle. Simply fill your squirt bottle with fuel, (remember to close your fuel can immediately) cap it, and pull the valve to open.
Then turn the bottle up over the wick allowing the fuel to empty directly onto the wick. Do not squeeze the bottle – allow the fuel to drip out. Squirting your wicks will save time and the amount of fuel you use. As you douse each wick, count slowly to yourself, “1-2-3-4….” This should be the right amount of fuel to start with. As you become more comfortable fueling your wicks, feel free to experiment by increasing or decreasing the count according to your preference or what works best with your wicks. A counted fuel-squirt assures that you do not over-soak your wicks. Also by timing the fuel that drips onto your wicks you can get a good idea for total burn time.
SPIN OFF. Squirting your wicks means you will likely NOT have spin-off, but you should spin-off anyway. Better safe than sorry, and it is the professional thing to do. FAR AWAY from the fuel station and the performance space, hoop rapidly around your waist for 10-20 seconds to be certain that there is no excess fuel on your hoop wicks.
B. Your FIRST BURN. The first time you burn your fire hoop, you should “cure” your virgin your wicks by fueling them and letting them burn out. You can do this one wick at a time, pre-performance. OR Just plant to hoop the first time until every wick burns out on its own. Curing your wicks will give them a longer life and condition them for all the burns to come.
C. HOW TO LIGHT YOUR HOOP
The simplest way to light your hoop is to have your “Safety” person light your wicks with a lighter. Another convenient lighting method is a stable, constant fire source, like a Tiki Torch, that allows you to self-light at eye level.
IX. What to Expect
The first time you fire hoop, two things may surprise you – the Sound and the Light. When spinning a lit fire toy around your body, you will notice quickly that fire is loud and it is bright. Make sure your Safety person knows to speak loudly if alerting you to danger. And since you will be able to see very little other than the fire, be certain that you know your space.
X. Ending your Performance
Ideally, you will want to continue fire hooping until your wicks go out on their own. If you get tired, or need to wrap up quickly, knee hooping can be the quickest way to extinguish the wicks on your hoop.
To end your burn before the wicks are extinguished, signal your “safety” person to snuff out the remaining lighted wicks with your fire blanket. Alternately, if the flames are small enough, you can simply blow them out one-by-one.
After your performance, your wicks will be hot. Make sure to store your fire hoop in a safe area away from the fueling station in a safe spot while it cools.
XI. Performing in Public Spaces
If you plan to perform somewhere other than your own private property, you will need to contact your local Fire Marshall for permission to burn. The Marshall may need you to submit a fire plan, complete with fire safety provisions to obtain a permit. S/he may also come out to inspect your equipment and fire safety stations prior to your performance.
If you plan to perform publicly often, it is advisable to form a good relationship with your local Fire Marshall and to be certain that you are adhering to local laws and regulations.
Be aware of local drought conditions and fire bans no matter where you perform.
Be Responsible: The ability for all fire dancers to perform publicly depends upon every one of us obeying the law.
HAPPY HOOPING!
Coming Soon… How to Photograph Your Burn!
Article écrit par Lila Chupa-Hoops, inspiré du Fire Hooping Guide de Superhooper.org
I – INTRODUCTION
Notre chemin avec le cerceau nous emmène souvent vers de nouvelles expériences. Parmi celles-ci, la découverte du hoop de feu est sans doute la plus impressionnante. Issue de la catégorie de la jonglerie enflammée, cette pratique se voit communément chez les artistes de rue mais elle est accessible à tous à condition de suivre des règles de sécurité spécialement conçues pour votre agrès.
Le feu est un élément vivant, il fait partie de la nature et rassemble les hommes depuis qu'on a appris à le maîtriser. Il réchauffe, il éclaire mais il a aussi le pouvoir de tout détruire sur son passage. Le feu réagit à beaucoup d'éléments extérieurs et si vous souhaitez danser avec, il est important de prendre en compte tous ces éléments et de penser à votre sécurité ainsi que celle de votre entourage, humain et environnement.
La bonne nouvelle, c'est que le cerceau de feu est certainement l'agrès le moins à risque pour débuter, sachant que les mèches se situent à l'extérieur de votre cerceau, qu'elles sont fixes et stables. Ceci étant dit, soyez plus que vigilants... il n'y a rien de plus vrai que le vieil adage : « A force de jouer avec le feu on finit par se brûler ». Je vous invite à lire et relire ces consignes rigoureusement afin de jouir d'une expérience unique et agréable à chaque fois pour votre plaisir personnel et pour vos spectateurs.
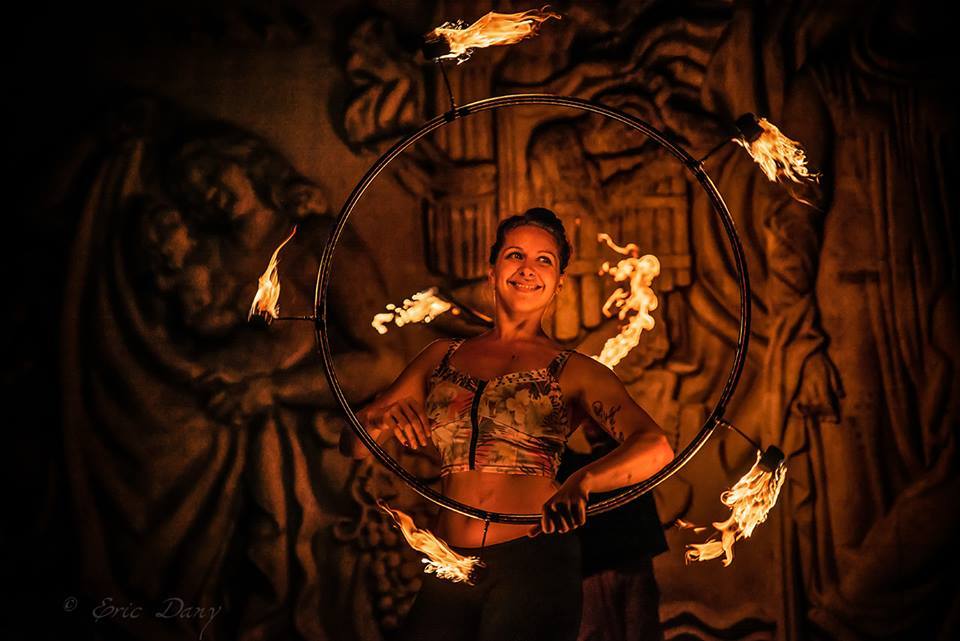
crédit photo : Eric Dany
II - LE TOOL BAG
Votre kit du feu contient les éléments essentiels dont vous aurez besoin pour chaque performance qu'elle que soit son importance. Il inclura également les items nécessaires pour prévenir et réagir face aux incidents. Nous vous conseillons de dédier un sac spécialement à cet effet afin de ne rien oublier et de garder les accessoires ensembles. Si vous ne pensez pas en avoir besoin, dites-vous que quelqu'un d'autre, lui, pourrait.
Une lampe torche / lampe frontale.
Vous enflammerez très souvent la nuit ou dans l’obscurité. Une source lumineuse vous sera très utile pour identifier vos produits et tremper vos mèches.
Outils pour manipuler, vérifier votre matériel : tournevis, pince, ruban adhésif d’électricien, paire de ciseaux.
Un trempoir
Votre liquide inflammable
Une couverture anti-feu (elle coûte entre 15 et 20€) . Sinon des serviettes humides.
Un pulvérisateur à eau
Un petit extincteur. Choisir un modèle polyvalent pour les feux de type A et B.
Ne surtout pas utiliser sur des personnes, uniquement pour l’environnement.
Un kit de premiers secours
Une crème de soin pour les brûlures (Biafine, Osmo Soft, Aloe Vera…)
De l’eau… oui vous aurez soif aussi !
Lingettes désinfectantes
Quand bien même vous auriez un tool bag complet, un binôme assurant votre sécurité reste indispensable. Vous devez avoir un binôme avec vous à chaque fois que vous enflammez, il devra savoir se servir du tool bag et réagir au moindre incident. Désignez quelqu'un de sobre. Il aura notamment la charge de vous regarder afin de détecter d'éventuels départs de flammes (vêtements, cheveux, peau...) mais aussi de veiller à ce que votre espace de danse soit respecté en maintenant toute personne/objet en dehors de cet espace.
III - LES COMBUSTIBLES
Présentation des liquides utilisés pour tremper les mèches.
Pétrole désaromatisé.
Utilisé pour nettoyer des pièces métalliques ou pour les chauffage d'appoint. Il est le liquide le plus utilisé en France pour jongler avec le feu. On le trouve pratiquement dans tous les magasins de bricolage et quincaillerie. On peut le trouver en grande quantité (5L, 20L) dans les rayons dédiés au chauffage, cela est la formule la plus économique. Il est appelé « Lamp Oil » à l'étranger. /!\ Pour des prestations publiques ou en intérieur peu ventilées, il n'est pas recommandé en raison des fumées sombres et très odorantes qui s'en dégagent.
L’eau de feu
Utilisé par les cracheurs de feu, ce produit est incolore et dégage une faible odeur de pétrole. Les flammes sont également moins chaudes. Il est le bon substitut au pétrole désaromatisé lorsque vous êtes en public. Elle s'achète dans des magasins spécialisés (matériel de feu, pyrotechnie, jongle...) en ligne ou à Paris.
IV - LES MECHES
Les mèches vont déterminer les points de feu sur votre cerceau. Elles sont faites de Kevlar, fibre synthétique qui a la spécificité de brûler sans se consumer. C'est à dire que vous pourrez les réutiliser à chaque fois pendant plusieurs années en les ré-imprégnant de liquide. Il existe plusieurs systèmes d'attache au cerceau ainsi que plusieurs formes de mèches. On trouve des cerceaux sur le marché avec les mèches directement intégrées dessus ou vous pouvez acheter les mèches séparément.
Ces mèches sont amovibles grâce à la bague de serrage et peuvent être posées sur n'importe quel cerceau à l'aide d'un tournevis (selon le diamètre du tube). Un tige flexible permet de maintenir la mèche à l'extérieur, environ à10cm de votre cerceau ce qui évite tout contact lorsque vous êtes à l'intérieur du cerceau. Les mèches doivent être réparties à égale distance afin de ne pas ressentir un déséquilibre, on en place généralement 4, 5 ou 6. Plus il y a de mèches, plus il fera chaud et moins d'espace n'est libre pour placer ses mains sur le cerceau. Nous conseillons de couvrir les mèches lorsqu'elles ne sont pas utilisées afin d'éviter le dépôt de poussières mais aussi car elles sont très salissantes après avoir été brûlées ! Des chaussettes ou pochons feront largement l'affaire. Veillez à toujours vérifier votre matériel avant et après l'usage au cas où il y aurait des éléments manquants.
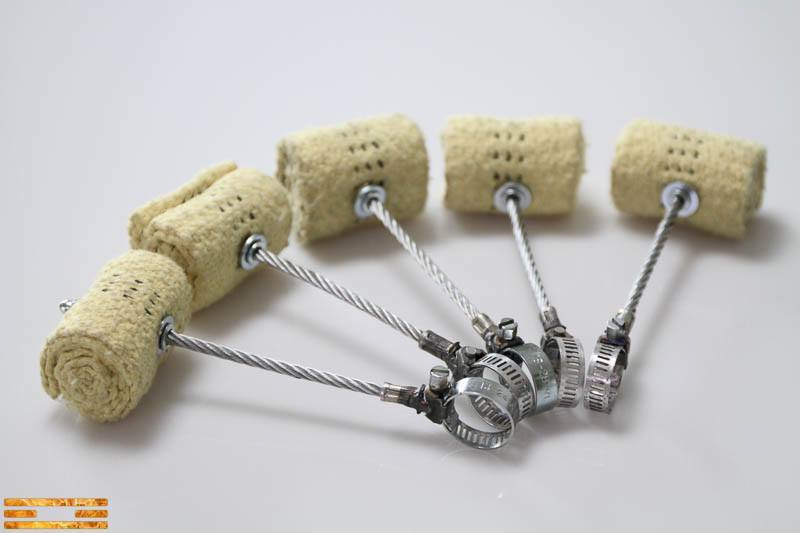
Photo : www.pyroplasticien.com
V - Le Burn
Etape 1 : Repérer et définir votre espace de danse
Avant même de tremper, assurer-vous d'avoir l'espace nécessaire pour danser. Faites un essai avec le cerceau éteint tenu à bout de bras pour évaluer la distance. Prenez garde à divers éléments qui pourraient interférer... au dessus, sur les côtés et sur le sol (arbre, poteau, objet au sol, cailloux...). Assurez-vous également que le sol soit sec afin d'éviter tout risque de glissade (des gouttes de pétrole tombées au sol sont plus glissantes que de l'eau). Enfin, informez-en votre binôme qu'il puisse veiller à ce que votre espace soit respecté par les autres.
Etape 2 : Définir votre station de trempage et de sécurité
Il est important que les produits inflammables soient disposés loin des points de feu (agrès, bougie, cigarette...). Cet espace doit être surveillé et les produits doivent toujours être fermés. En aucun cas vous ne devez laissez une bouteille ouverte en dehors de l'étape de trempage, un accident peut très vite arriver. Ensuite, déterminez ou bien repérez la station de sécurité où sont disposés l'eau, extincteur, trousse de secours et couverture anti feu...
Etape 3 : Se vérifier, ainsi que son matériel
Avant et après chaque performance, veuillez vérifier la stabilité de votre matériel. Nous recommandons de se fournir chez des professionnels afin de réduire le risque d'accident. Vérifiez toutes les parties de la mèche (tige, boulons, vis etc.) ainsi que le système de fermeture de votre cerceau car il peut s'ouvrir lui aussi à tout moment. Ensuite, êtes-vous prêt à burner ? Premièrement, vous devez être sobre. N'oubliez pas que vos actes peuvent être dangereux pour vous mais aussi pour votre entourage ! Respectez-le ! Vous ne devez porter sur vous que des matières naturelles comme le coton, en aucun cas des matières synthétiques qui en cas de brûlures peuvent largement endommager votre peau. Privilégiez des vêtements épais et évitez les vêtements amples qui pourraient s'accrocher aux mèches. Protégez également vos cheveux en les attachant en chignon ou en portant un bonnet.
Etape 4 : Trempage
Plusieurs options sont possibles pour imbiber les mèches de Kevlar. Vous pouvez choisir de verser le liquide dans un contenant type boîte de conserve puis de tremper les mèches les unes après les autres dedans. Nous vous conseillons de prendre un trempoir d'une profondeur maximum de 20cm sinon votre cerceau bloquera l'accès au fond et vous ne voulez pas le remplir démesurément non plus. Le temps de trempage ne dure que quelques secondes, la disparition des petites bulles indique que la mèche est complètement imbibée. Secouer un petit peu la mèche pour faire goutter l'excédent de liquide au dessus de trempoir ou à l'aide d'un gant, pressez les mèches à la main pour égoutter plus efficacement. La deuxième manière est une option plus écologique par rapport au gaspillage de liquide. En utilisant une bouteille en plastique de sport avec valve et bouchon, vous pouvez verser le liquide de façon très précise sur la mèche sans en mettre à côté. Ne jamais verser le liquide directement depuis le bidon !!!
Etape 5 : Egouttage
Dans le cas où vous trempez complètement vos mèches, vous devrez à chaque fois égoutter votre agrès consciencieusement. Il est impératif d'évacuer l'excès de liquide avant d'enflammer en faisant tourner rapidement votre cerceau. Cette étape doit se faire loin des points de feu et loin des personnes car la force centrifuge exercée par le cerceau projette les gouttes de pétrole très loin.
Etape 6 : Allumage
Allumez votre cerceau à plusieurs mètres de la station de trempage à l'aide d'un point de feu. Cela peut être à l'aide d'un briquet, un allume gaz, une torche ou une flamme éternelle. La meilleure solution reste qu'un de vos collègues allume les mèches pendant que vous tenez le cerceau. Tenez le toujours à l'horizontale et évitez de rester immobile plus de 10 secondes car s'il y a du vent, les flammes risquent de chauffer trop intensément le plastique du cerceau.
Etape 7 : Le Burn
Et voilà ! Vous pouvez burner ! Un grand nombre de mouvements sont possibles, tant que vous le ferez tourner sur le corps « on-body », il y a très peu de risques. Si vous souhaitez faire de la manipulation avec les mains, attendez ua moins la 1ère minute que les flammes soient moins grosses. Evadez-vous, apprivoisez la chaleur et le bruit des flammes, trouvez votre flow tout en restant attentif aux personnes qui vous entourent, aux autres burners qui partagent l'espace de démonstration et aux spectateurs. Un burn dure environ 3 minutes 30.
Etape 8 : Extinction
Vous pouvez au choix danser jusqu'à l'extinction de vos mèches ou bien les éteindre vous-même. Nous déconseillons néanmoins de les laisser toutes se consumer car cela réduit leur durée de vie. En faisant tourner le cerceaux aux genoux, la vitesse de rotation s'accroît et cela à souvent pour effet de couper le feu. Autre solution, si vous êtes à la fin du burn et que les flammes sont petites, vous pouvez les souffler une à une. Dans le cas où vous devriez vous arrêter plus tôt, procédez à l’extinction de vos mèches avec votre partenaire de sécurité qui utilisera une couverture anti-feu. Les fumées émises sont mauvaises pour la santé donc après votre session, laissez votre hoop refroidir dans un lieu dégagé de toute personne. Si vous souhaitez recommencer, attendez au minimum 20 minutes le refroidissement du tube (surtout si vous utilisez un polypro).
Pour s’entraîner sur Paris tous les samedi soirs au Palais de Tokyo.